
Toilets
Loose toilet handle: checks, adjustments and replacement
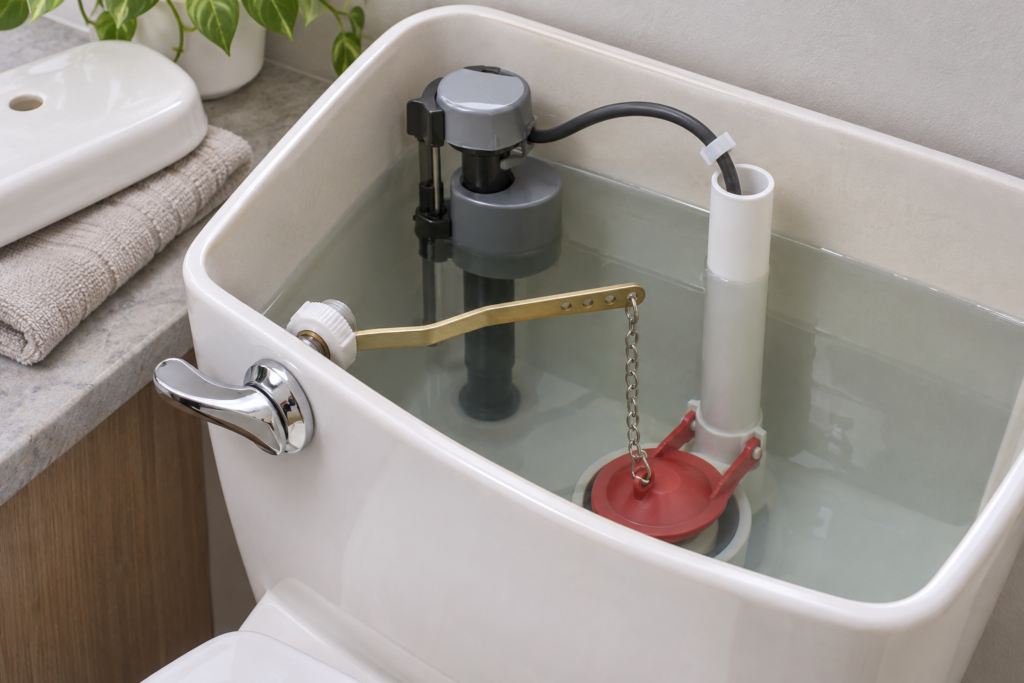
A loose toilet handle does not automatically mean the toilet needs replacing. First identify what moves: the mounting against the tank wall, the handle on its shaft, or the arm inside the tank. A disconnected chain can also make a working handle feel useless. Each situation needs a different response. Identify the mechanism and check its instructions before tightening any part.
Stop testing if the porcelain is cracked, water appears on the floor, or the bowl rises unusually during a flush. Close the toilet shutoff only if you can reach it safely and it turns without force. A seized or leaking valve needs attention. Do not force the valve, brace against the tank, or keep flushing to investigate an uncertain drain.
Loose toilet handle: find the source of movement
On a conventional gravity toilet, the handle passes through the tank wall. An inside nut secures the assembly against the ceramic. The arm inside then pulls a chain connected to the flapper. Once you release the handle, the mechanism should return to rest and allow the flapper to close. A fault at any of these connections produces a different symptom.
Some rotation is necessary to operate the flush. However, a mounting that shifts against the wall, a handle that spins without moving the arm, or a lever that stays down deserves a closer look. Use light pressure to observe the unwanted movement. Pressing harder will not tell you whether the mounting is loose or the shaft has failed.
Start outside the tank without taking anything apart. Check whether the trim sits flat and whether a gap opens beside the ceramic. Notice whether the entire tank moves instead of just the handle. An unstable tank or toilet is a separate issue. Do not tighten tank bolts as part of a handle adjustment.
The mounting shifts against the tank
If the handle and its mounting move together in the opening, the retaining nut may be loose. A split nut, damaged threads, or an incompatible assembly can create similar movement. Look at the inside mounting before deciding that tightening will solve it. Extra pressure cannot restore the strength of a broken plastic part.
Consider when the problem began. Movement immediately after replacement may indicate an installation or compatibility issue. Gradual movement can have another cause. A loose toilet handle that repeatedly shifts needs assessment of the threads, fit, and operating load. Repeatedly tightening it harder is not a reliable maintenance plan.
The handle turns but the arm stays still
If the mounting remains stable while the handle rotates without moving the inside arm, their connection may be worn or broken. Tightening the nut against the tank wall will not repair that connection. A replacement must match the actual assembly. A decorative handle with the same finish does not necessarily have the right shaft or attachment.
Alternatively, the arm may move normally while a detached or overly slack chain fails to lift the flapper. Watch the chain during one gentle operation. Identify where movement stops before buying a handle. This separates a failed command from a disconnected linkage and avoids replacing a working part.
Prepare to inspect the tank safely
Clear a stable surface and cover it with a folded towel for the lid. Lift the lid with both hands and place it flat. Do not stand it on its edge against a wall. Ceramic lids are heavy and brittle; a fall can cause injury and leave the toilet without a suitable replacement cover.
Some lids carry buttons connected to the mechanism. Other toilets use pressure assistance or a special control. If the lid does not lift freely, stop pulling and find the model instructions. This guide concerns accessible handles on gravity tanks. It does not cover concealed tanks, wall plates, pressure vessels, or electrical toilet equipment.
Take an overall photograph before changing anything. Include the handle mounting, retaining nut, arm, chain attachment, and flapper. Photograph the tank model number or the original paperwork as well. These details make parts identification easier. Avoid scrubbing away useful markings while trying to clean the inside of the tank.
Before a hands-on adjustment permitted by the manufacturer, turn off the water and flush only if drainage is normal. Keep the work area dry. Do not disconnect the supply hose or remove the fill valve merely to reach the handle. If access requires disturbing those components, have the work assessed instead.
Check whether the nut has a reverse thread
Many toilet handle nuts have reverse threads. Turning in the familiar tightening direction can therefore loosen them. Describe the direction while looking at the nut from inside the tank. The handle being on the left or right of the toilet does not by itself establish the thread direction.
The Fluidmaster 681 lever instructions provide a specific example: that nut is fitted counterclockwise and finally tightened by hand. Use this as a model-specific reference, not a universal instruction. Confirm the directions for the assembly actually installed before applying force.
If you cannot confirm the thread direction, do not experiment with pliers. Force against the wrong thread can damage plastic or transfer stress to the ceramic wall. Identify the part first. An unfamiliar fixing is a reason to gather information rather than increase torque until something moves.
The mounting should stay put while the handle rotates
The aim is not to lock the handle in place. Its mounting needs to remain stable while the operating shaft moves through its intended range. Depending on the design, excessive tightening can interfere with the return. After an approved adjustment, check that the handle returns freely and the arm clears the tank wall.
Keep the specified washers, sleeves, and mounting components in their intended order. Do not add glue, thread tape, or improvised spacers to eliminate movement. A handle assembly is not treated like a threaded water-supply joint. An improvised addition may change the arm position or conceal poor fit without correcting it.
When a loose toilet handle can be tightened
A small adjustment may be reasonable when the instructions allow it, the porcelain is intact, and both the nut and threads are sound. You must be able to reach the mounting without moving other components. If those conditions are missing, stop before dismantling more of the tank to gain access.
Follow the manufacturer’s sequence and tightening limit. For the documented example, final tightening is by hand. Keep the outside assembly in its proper position without twisting the arm. Do not aim for an absolute locked feeling. Once the mounting is stable and the handle operates freely, extra force can become harmful.
If the nut turns without engaging, starts crooked, or has a visible split, the problem is more than simple looseness. Keep the toilet out of use if reliable operation is uncertain. Avoid a temporary arrangement that could leave the flapper open. Retain the parts and photographs to identify the correct replacement.
A badly corroded metal nut may resist even when turned in the correct direction. Do not use the tank wall as a brace or apply heat. Aggressive chemicals can affect nearby components as well. Have a qualified person deal with a fixing that cannot be removed without substantial stress.
Check the chain at rest and during the flush
The chain transfers movement from the lever arm to the flapper. If it is too short, the flapper may not close fully. If it is too long, it may absorb the useful travel or become caught. The appropriate setting depends on the tank geometry, the flapper, and the manufacturer’s instructions.
Observe the chain with the handle released and the flapper closed. It must allow the valve to seat without continuous upward tension. The 681 instructions describe a small amount of slack. Other mechanisms may specify something different. Do not apply one chain measurement to every toilet or to an unfamiliar secondary linkage.
Check alignment as well as length. A chain pulling sideways or rubbing against another part can interfere even when its slack appears reasonable. Do not choose an attachment hole at random. Preserve the documented arrangement and obtain help if several positions seem plausible but you cannot confirm the intended one.
After an adjustment, the flapper needs to fall back without being held open. If water continues into the bowl or the tank refills between uses, follow the guide to a toilet that keeps running. Fixing a loose toilet handle does not establish that an internal leak has been fixed.
A handle that sticks or must be held down
A handle that remains down can keep the flapper open. Look for the arm touching the lid, tank wall, float, or another component. Observe without bending the arm. Interference may indicate an unsuitable replacement or incorrect positioning rather than a mounting that needs more tightening.
The lid matters to the diagnosis. A mechanism can operate with the tank open but catch once the lid is replaced. Check the lid in its correct position. Do not leave it offset to create artificial clearance. The toilet needs to work in its complete normal configuration, including the cover.
Having to hold the handle for an adequate flush can also involve the flapper, its adjustment, or the available water in the tank. Do not automatically shorten the chain to compensate. That may increase lift while preventing the flapper from seating properly after you release the control.
If the lever operates correctly but the flush remains weak, follow the separate guide to telling a flush mechanism fault from a blockage. A rising bowl is a stop condition. More pressure on the handle cannot safely resolve an obstruction downstream.
Select a compatible replacement
Before shopping, record the toilet brand, tank model, and existing part number if readable. Photograph the mounting from both sides. Front, side, or angle mounting, the shape of the opening, and the available internal space can all matter. Finish and appearance alone do not establish compatibility.
A universal handle still has limits. Some assemblies allow a specified adjustment; others require a part matched to particular models. Check the covered applications and installation directions. The Canadian KOHLER lever and nut parts catalogue illustrates that separate replacement references exist. It does not establish that the linked part fits your toilet.
Do not enlarge or reshape the ceramic opening to accommodate a replacement. Bend an arm only when its own instructions specifically permit that adaptation. A method intended for one lever does not apply to every material or assembly. Reconsider any part that requires force against the tank to fit.
Compare the travel and clearance after fitting as well. A longer arm can contact the fill valve; the wrong angle can pull the chain sideways. Replacing a worn handle helps only when the new assembly transmits movement and returns to rest without catching elsewhere in the tank.
Keep the old reference until the repair is verified
When arranging a replacement, keep the original part number and photos even if the old handle is broken. Packaging can look similar across several variants. Check whether the quoted part includes the mounting nut and any required adaptor. Missing hardware should be resolved before a partly assembled toilet is returned to use.
If the supplier cannot confirm the match, ask what measurements or model photographs are needed. Avoid making several speculative modifications to a returnable part. A clear record of the tank and mounting often provides more useful information than a description such as standard toilet handle. Compatibility is a practical fit question, not a styling preference.
Verify a complete operating cycle
After work completed according to the instructions, restore the supply gently if the shutoff operates normally. Stay beside the toilet during filling. Look at accessible connections and the floor. If a leak appears, stop the check and close the water when you can do so safely without forcing the valve.
Wait until the tank reaches its normal level before testing. Press once normally, then release. Confirm that the arm operates the mechanism, the handle returns, and the flapper can reseat. A flush that works only while you hold the handle down or lift it back manually still needs attention.
Allow the tank to finish refilling. The water should stop according to the model’s intended operation. Observe the bowl and listen for another refill without use. You are looking for normal operation of this toilet, not imposing one refill deadline on every tank design or water-supply condition.
The City of Laval describes a dye check for water passing from the tank to the bowl. Use a method suitable for the toilet and leave it unflushed during the specified observation period. Colour reaching the bowl indicates water transfer, but does not identify the failed part on its own.
Rental units, condominiums, and special systems
In a rental, report the symptom to the owner or property manager before buying parts or changing the mechanism. Explain what moves and disclose any visible leak. Responsibilities and permissions depend on the situation. An online repair procedure does not replace the building’s maintenance arrangements or establish who should carry out the work.
In a condominium, check the applicable rules and contact person if water needs to be shut off. Do not operate a shared valve for a defective handle. A shutdown affecting other occupants needs coordination. Supply the photos and model information so the person arranging the repair can plan the correct access.
In Quebec, permission to perform plumbing work yourself depends on factors including the building and the work involved. The CMMTQ explains owner-work limitations. Check the requirements for your project if it goes beyond observation or a routine adjustment. This guide does not decide an individual regulatory authorization.
Loose toilet handle: when to request a repair
A broken component, damaged thread, repeatedly loose mounting, or damaged porcelain warrants assessment. The same applies when the mechanism is inaccessible or you cannot isolate the water normally. The purpose is to restore reliable operation while avoiding an additional leak, rather than keep an uncertain temporary fix in service.
For a toilet repair or installation request, provide the model, photos, and a description of the movement. State whether the handle returns by itself, whether water keeps running, and whether the trouble began after a replacement. This information helps with parts and access planning without guaranteeing a remote diagnosis.
Ask what the proposed work includes: identifying the part, replacing what is needed, testing operation, and checking for leaks. The cost depends on the mechanism, condition of the fixings, and access. A successful simple tightening does not justify an additional service, while difficulty finding one part does not automatically require immediate replacement of the whole toilet.
Frequently asked questions
Can I tighten the retaining nut with pliers?
Do not choose a tool by habit. The documented example calls for final tightening by hand and warns against excessive force. Check the instructions for your own part. If the nut resists, confirm thread direction and condition rather than pushing harder against the porcelain.
Why does the handle become loose again?
Damaged threads, a split nut, unsuitable fit, or interference with the arm may explain recurring movement. Identify the cause instead of tightening harder each time. A photograph before and during gentle operation helps show whether the mounting, shaft, or complete assembly is moving.
Will a new handle correct a weak flush?
Only if the defective command prevented the mechanism from operating properly. Low tank water, an unsuitable flapper, or an obstruction can produce a weak flush despite a sound handle. Observe the complete cycle and stop testing if the bowl rises instead of draining normally.
Does the whole toilet need replacement?
Not automatically. A compatible command assembly may be replaceable separately. Ceramic condition, parts availability, and overall operation inform the decision. For another symptom, browse the Toilets guides and choose the article matching what you actually observe rather than replacing parts by trial and error.