
Leaks, faucets and fixtures
How to replace a showerhead without damaging the connection
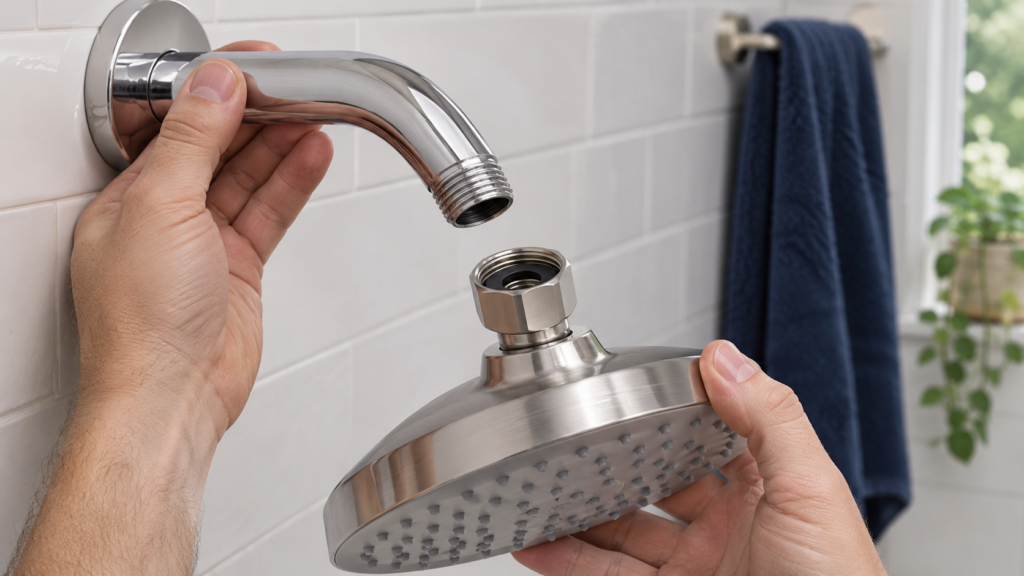
You can often replace a showerhead without disturbing the plumbing inside the wall. The important moves are to keep the shower arm steady while removing the old head, identify the seal required by the new model, and start the new fitting straight by hand. Stop if the arm moves where it enters the wall, its threads are damaged, or water appears behind the wall flange. Those signs call for a closer look than a routine showerhead swap.
This guide covers the visible connection between an existing shower arm and a fixed head, or a hand shower kit that mounts on that arm. It does not cover the shower valve, cartridge, concealed pipe fitting, or a new shower arm. Use the instructions for your exact make and model as the final authority for washers, thread tape, assembly order, and tightening. A method that works on one product can cause trouble on another.
Before you replace a showerhead: identify the problem
A weak, uneven spray does not always mean the showerhead has failed. Mineral deposits can partly block its nozzles. Depending on the finish and the manufacturer’s care instructions, careful cleaning may restore the spray. Do not soak a decorative finish in a strong acid or use an abrasive pad without checking the product guidance; some finishes can be damaged. Replacement makes more sense when the body is cracked, a swivel joint leaks, cleaning cannot restore the flow, or a different style better suits the household.
Locate the water before choosing a repair. A drip from the joint between the showerhead and arm while the water runs suggests a problem at that visible connection. Moisture at the wall flange suggests a different location. Water that drains briefly from a head or hose after shutoff may simply be water left inside. A continuous drip after the control is off can point toward the shower valve. A new showerhead will not fix a valve that fails to shut off fully.
A simple replacement is most reasonable when the arm is firm, the nut is accessible, and the old head starts to unscrew with moderate effort. Reconsider the job if the fitting is seized, the arm twists at the wall, a crack is visible, or the work requires opening the wall. Forcing a stuck head can loosen a hidden connection, making a small accessory project into a concealed leak.
Choose a compatible product before opening the package
Take a clear photo of the old head, its connection, and the space around it. Many residential products fit a common shower-arm connection, but a similar appearance does not prove that a special adapter or accessory will fit. Check the dimensions and compatibility listed by the manufacturer. A hand shower kit may include a bracket, diverter, hose, and several washers. Each connection has a purpose; the pieces should not be rearranged by guesswork.
Read the parts list before removing the old head. A fixed model may have a flat washer inside its swivel nut, a debris screen, or a specific locking feature. A hose commonly needs a washer at each end. Some installation sheets instruct you to wrap thread seal tape around the arm; other models explicitly say not to use it for their connections. The exact model and the particular joint within the kit determine the approach. Keep the diagram beside you during assembly and identify the parts before they disappear down the drain.
Think about use as well as fit. A large rainfall head needs enough clearance and can place more leverage on an arm that is already loose. A hand shower needs a hose path that does not pull on the joint or rub on a sharp edge. If lower water use is a goal, compare the stated flow rate and an independent certification rather than relying on an unqualified “eco” label. For example, the EPA’s WaterSense program certifies showerheads with a maximum flow of 2.0 US gallons per minute and performance criteria for spray. Verify the actual product and any requirements that apply where you live.
Check whether there is room to reach the nut without hitting a glass door or tiled corner. In a shared bathroom, consider the bracket height, hose length, and ease of changing the spray setting. Keep the receipt and packaging until the leak test is complete. The model number can help you find a missing washer, a care sheet, or the manufacturer’s support page later.
Set up a safe work area
Close the shower control fully and let the fixture cool if it was recently used with hot water. A Moen installation sheet for one head instructs the installer to turn off the water supply before removal; follow the sheet for your product and use the accessible shutoff when required. Do not dismantle a connection while water is flowing. If the control will not stop the flow, deal with that fault first. Put a towel on the shower floor to protect the surface and catch a dropped part, and cover the drain so a small washer cannot disappear.
Gather a good light, a soft cloth, the new head and instructions, and only the tool your model or the old fitting genuinely calls for. Keep metal tools away from tile and plated finishes. An unstable stool on a wet shower floor presents a fall risk; work from secure footing or ask someone who can safely reach the connection. Clear bottles and soap dishes from the work area and dry your hands before gripping the fittings.
Look at the arm before you turn anything. It should appear firm where it exits the wall. The round flange or escutcheon usually hides the opening; it is not a handle for bracing the pipe. Place a hand on the exposed, rigid part of the arm to sense any movement without pushing against the wall surface. Deep corrosion, a split, or a distorted end deserves attention before any new load is placed on the connection.
Remove the old head while holding the arm steady
Support the shower arm with one hand near its exposed end. With the other hand, turn the showerhead nut counterclockwise when viewed from its open end. Begin by hand. Once the nut loosens, continue by hand while supporting the weight of the head. With a hand shower or diverter, follow the manufacturer’s removal order so you do not twist the entire assembly against the wall connection.
If the nut resists, do not pull the arm downward or use the showerhead as a long lever. Some products permit a wrench on a specified nut. If so, protect the finish with a soft barrier and apply gradual pressure while watching that only the nut moves. A toothed plier can mar a finish or deform a thin nut. If greater force produces no clear movement, or if the arm starts to turn at the flange, stop. A professional removal is less disruptive than a hidden joint coming loose.
After removal, examine the exposed arm. Old tape and residue should be cleared according to the new product’s instructions so its sealing surfaces can meet cleanly. Do not scrape the threads with a blade; a small gouge can create a new problem. A damp cloth or soft brush can lift light deposits. Dry the end and inspect it under good light. The threads should look continuous and round. If the leading thread is crushed or the end looks out of shape, do not try to drive a new nut onto it.
A quick photo at this stage can be useful if a leak later needs diagnosis. It records the condition of the arm before the new head went on. White deposits alone do not prove a leak in the wall; the location of fresh moisture during a controlled test provides better information.
Let the specific joint determine the seal
This is the step most likely to prevent a drip and protect the fitting. Not every shower connection seals in the same place. Many products have a flat rubber washer inside a nut that presses against the mating surface. Other products call for thread seal tape on the arm. One Moen sheet for an older head tells installers to apply tape on the shower arm. Another Moen sheet for a combination head with diverter says tape is not recommended and shows washers at the hose connections. Even two products from the same maker can require different steps.
Unpack every washer carefully. Match its position to the diagram and make sure it sits flat. A missing, folded, or crooked washer can leak although the nut feels tight. A hose may need one washer at each end; do not assume the washer already in the bracket covers the hose joints. Leave a supplied debris screen or flow component in place unless the manufacturer instructs otherwise. Removing internal pieces to make the spray stronger can compromise the product’s intended performance.
If the instructions call for tape on the shower arm, remove old tape first and follow the specified direction, number of wraps, and placement. Keep loose pieces out of the water opening. If the instructions say not to use tape on a washer-sealed joint, do not add it as extra insurance. It can change how the nut engages, hide a misplaced washer, or keep the intended surfaces from seating. Do not add pipe compound to an unspecified connection either.
If the box has no clear instructions, look up the exact model number on the manufacturer’s website. Generic advice for a different head is not enough, especially with a diverter or hand shower. Obtain the correct replacement washer or adapter if a part is missing. Extra wrench force cannot make an incompatible or incomplete connection reliable.
Replace a showerhead by starting the new nut by hand
Hold the female fitting square to the shower-arm threads. Turn it gently by hand and feel for smooth engagement. If it catches at an angle, back it off and start again. The first few turns are where cross-threading begins. Support the head’s weight as you turn so it does not hang on partially engaged threads. Never use a wrench to start the fitting; the tool can hide the warning that the threads are not aligned.
Tighten only as the product instructions direct. Many washer-sealed assemblies call for hand tightening, while some specific models direct a measured final turn with a tool. An older Moen instruction sheet calls for a wrench on its model; Delta’s guidance for several contemporary arrangements emphasizes hand tightening and avoiding too much force. These are model-specific directions, not a universal conflict to solve by choosing the tightest method. A bracket, hose, and diverter may each have different tightening instructions within one kit.
Keep an eye on the shower arm throughout the final turns. It should not rotate with the nut or move inward at the wall. Support a heavy head until the assembly is stable. Aim the head within the motion its swivel allows; do not force the swivel to its stop to compensate for a badly oriented arm. Securing the nut and adjusting the spray direction are separate actions.
Avoid improvised extensions to change the height or reach. The arm and its concealed fitting have a particular geometry; extra weight or leverage can expose an existing weakness. If the new product requires replacing the arm or altering the pipe, pause and treat that as a separate project with its own instructions and scope.
Test the connection while you can still see it
Wipe the arm, nut, bracket, hose connections, and wall flange dry. A dry starting point makes a fresh drip easier to find. Turn the shower on gradually while staying clear of a hot spray. Use a comfortable temperature rather than reaching through scalding water to inspect a nut. Watch the head-to-arm joint during flow, then each hose and diverter joint if your kit has them.
Touch a dry tissue below each joint to find small amounts of moisture. Look at the flange and adjacent wall without removing the trim or opening the wall. Try the normal spray settings and move the hand shower gently through its ordinary range. A fitting can appear dry at a low flow and leak when the hose is moved or the flow changes. Let the shower run long enough for a useful check, shut the control, and observe for several more minutes.
A few drops from the spray face after shutoff can be water retained inside the head or hose. That differs from a continuous drip or fresh water appearing at a connection. If water comes from the head nut during operation, shut off the flow, dry the area, and recheck the alignment, washer, and model instructions. Do not keep tightening as the default fix. A missing or folded washer will not be repaired by crushing the nut harder. If moisture appears at the flange or wall, stop the test and have the arm and concealed connection evaluated.
Look again after the next several normal showers. Recurring moisture deserves investigation even if the first short test passed. Save the instructions and identify any spare parts, but double-check that a washer left in the box is genuinely a spare rather than one that belongs in the assembly.
Troubleshoot by the location of the symptom
Water leaks at the head nut only while the shower runs. Check that the fitting is straight, the required washer is present and clean, and the tape decision matches the instructions. Dry it, reassemble according to the model, and test again. Continued leakage may mean a damaged sealing surface or deformed threads, in which case replacing the affected part is more useful than additional force.
The arm turns or shifts at the wall. Stop. The head attaches to the arm, but the arm itself connects to a fitting behind the finished wall. Rotation can loosen that concealed joint. Pressing the flange against the tile does not secure it. Avoid using the shower until the risk of a hidden leak has been assessed.
The new spray feels weaker than expected. Check whether other fixtures have normal hot and cold flow, whether packaging or debris is caught at the inlet, and what flow rate the new model advertises. Keep its internal flow components in place unless the maker directs otherwise. A pressure or flow problem across several fixtures will not usually be solved by changing only the showerhead.
The shower continues dripping after you close it. See whether the water stored in the head and hose empties and then stops. A continuous drip, especially one that existed before the swap, points more toward the shower control than the new head-to-arm seal. Valve repair is a separate task with different parts and risks.
The hand-shower hose twists or rubs. Check its orientation and both end connections against the diagram. Do not leave the hand shower hanging on a partly engaged nut. Route the hose so it does not pull the arm or scrape repeatedly against a sharp corner.
When to ask a plumber
Seek help if the arm moves at the wall, moisture appears behind the flange, threads are damaged, the old fitting is seized, or the new product does not match the existing connection. A plumber can also distinguish a simple washer issue from a fault with the arm, concealed supply connection, or valve. In Québec, an enterprise hired for plumbing work needs the appropriate contractor licence; the Régie du bâtiment du Québec describes subclass 15.5 for plumbing contractors. Describe the observed problem and confirm the scope of work before it starts.
A clear photo can help explain the issue, provided it can be taken without reaching into hot water or near an electrical hazard. Note whether the leak occurs only during use or also after shutoff, whether the arm moves, and the exact new model. These details help a professional prepare, although they cannot replace inspection. If water reaches a light, outlet, or other electrical installation, keep away and have the situation made safe rather than touching wet equipment.
For help with a shower leak or fixture repair, see ProDrain’s faucet and fixture services. Tell the team exactly where the water appears and whether the shower arm moves at the wall. A photo of the connection and model can make the conversation more useful.
Frequently asked questions
Must I shut off the main water supply to change a showerhead?
Close the shower control completely and follow the instructions for the specific model. Some instructions require the supply to be off before removing the old head. If the control will not stop the water, a leak continues, or the job involves the arm or pipework, do not work under pressure. Find the appropriate shutoff or ask for help.
Does every shower arm need plumber's tape?
No. The answer depends on the model and the particular joint. Some instructions specify tape on the arm threads; others rely on washers and warn against tape. Check the product diagram for each connection, especially on a hand shower or diverter kit.
Can I tighten a leaking head with pliers?
Do not start there. Turn the water off and check the washer, alignment, and manufacturer’s instructions. Pliers can scratch the finish or crush a nut, while excess force can damage threads or turn the arm. Use a tool only where the instructions allow it and protect the fitting.
How would I know if the connection inside the wall was disturbed?
An arm that rotates at the flange, fresh moisture at the wall opening, or water appearing behind the finish are reasons to stop. The concealed connection cannot be fully inspected from the shower side. Do not repeatedly run the shower to see whether it holds when these signs are present.
Will a new head fix a drip after the shower is turned off?
Not necessarily. A small amount of stored water can drain after shutoff, but a continuing flow can come from the valve or cartridge. Changing the showerhead addresses the head and its visible joint. It does not repair a control that no longer closes properly.
Is a hand shower installed the same way as a fixed head?
A fixed head commonly has one main arm connection. A hand shower adds a bracket or diverter and a hose, often with multiple washers. Follow the kit’s illustrated order and test every joint separately after assembly.
A good final check
The finished installation should leave the showerhead secure, the shower arm still, and every visible joint dry during and after use. Choosing a compatible model and reading its instructions takes longer than turning a nut, but those steps protect the existing connection. When a fitting requires force or water appears at the wall, stop the simple replacement and have the connection checked. That is how a small fixture upgrade stays a small project.
Sources and product instructions
- Moen — INS411C instructions
- Moen — INS10875 instructions
- Delta — showerhead replacement
- EPA WaterSense — showerhead technical sheet
- RBQ — plumbing contractor licence
For related advice, see Leaks, faucets and fixtures.