
Leaks, faucets and fixtures
Water leaking below a shower or behind the wall: diagnosis and next steps
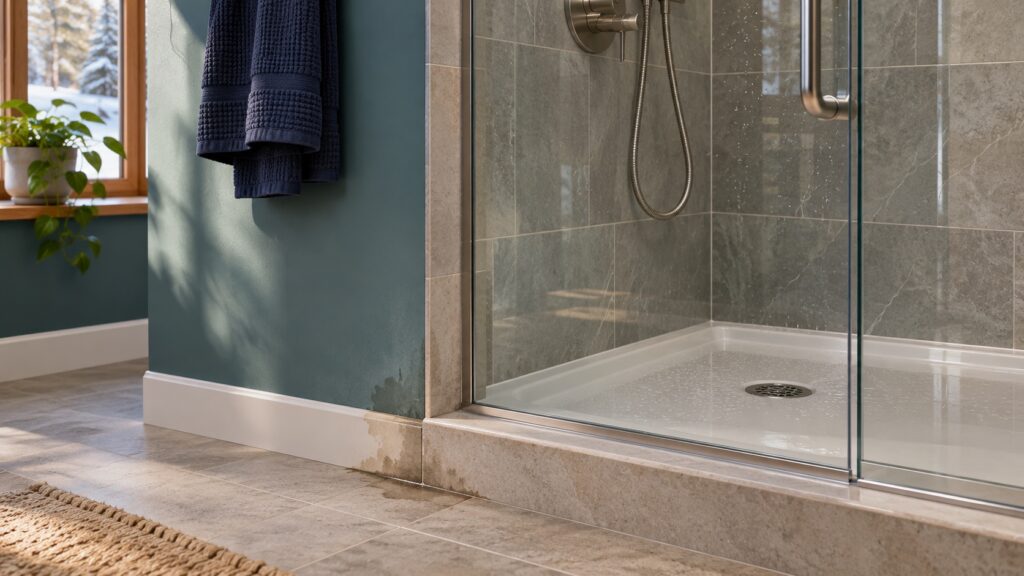
A shower leak may first show as a ceiling stain below the bathroom, a swollen baseboard, or a persistent odour. None of these signs identifies the failed component. Water could be escaping from a pressurized supply line, a drain connection, the joint between a shower base and wall, or the waterproof assembly behind tile. The useful first step is to stop using the affected shower, protect people and belongings, and record exactly when and where moisture appears. A sound diagnosis traces the water path and confirms the cause before anyone closes or refinishes a surface.
Act first if water is spreading
If a ceiling is dripping, sagging, or changing shape, keep people and belongings away from the area below. Do not press on the ceiling or puncture the finish to release water. If water reaches a light fixture, outlet, or electrical appliance, do not touch the water or equipment. Have the circuit made safe by a qualified person. If the electrical panel is in a wet area or cannot be reached safely, do not approach it. An active or substantial leak calls for prompt professional help.
Turn off the shower controls and ask everyone to leave this fixture unused until the source is understood. If water continues to appear while no one showers, a pressurized supply leak or another source becomes more plausible. If you know how to use the main water shutoff safely, closing it may limit a supply leak. It will not instantly empty a wet cavity, nor will it stop rain infiltration, a different appliance, or water already in a drain line. Avoid manipulating pipes concealed behind finishes.
Photograph the stain, shower threshold, wall, and room below before wiping accessible surfaces. Record the time, the last shower use, and any change you noticed. That history helps a professional choose a targeted investigation, although it is not a diagnosis on its own. Move dry belongings, absorb only visible water you can reach safely, and ventilate the area where doing so will not spread water toward electrical components. Health Canada advises prompt control of moisture because damp materials can support mould growth.
Understand the four possible shower leak paths
A shower leak can follow several systems that move water into a wall or floor. The supply brings water to the mixing valve and shower outlet. The drain carries used water from the base to the drainage system. The base, walls, corners, threshold, and pipe penetrations form an enclosure that must manage spray. Finally, water can escape outside a door or curtain, then enter a vulnerable floor or wall joint. More than one fault can be present, so a visible defect should not end the investigation prematurely.
A showerhead that drips after the controls are closed often points toward the fixture; our guide to a leaking shower tap addresses that particular symptom. A stain below the shower or a swelling wall needs a broader approach. The wet spot may be some distance from the entry point because water can follow framing, a floor slope, a pipe, or the back of a panel before it emerges. The shape or colour of the stain cannot identify a part to replace.
Waterproofing behind tile is especially important in a tiled shower. Intact tile and clean grout do not prove that the assembly is watertight. Manufacturer Schluter explains that tile and grout are not inherently waterproof; a suitable system must manage water at corners, penetrations, and the drain. Regrouting can improve appearance without correcting a failed membrane or drain connection. The same caution applies to a fresh bead of sealant placed over an unknown defect.
Read the timing of a shower leak without provoking it
With a suspected shower leak, timing is a clue, not a home test to repeat. A mark that grows while the shower stays unused could come from a supply line, another fixture, outside water, or moisture already trapped in materials. A mark noticed mainly after showers might involve the drain, pan, door, or walls. Absorbent materials can release water long after the shower ended. A delay of several hours therefore does not establish that the supply plumbing is sound.
Write down whether moisture was visible while water ran during an ordinary use, just afterward, or the next day. Note what else was happening: bathtub, sink, toilet, washing machine, rain, or floor cleaning. In a multiunit building, report signs that could be connected to the unit above or a shared service line; the nearest shower is not automatically responsible. This record can prevent work on the wrong fixture. It requires no deliberate water run, dye, invasive opening, or improvised pressure test.
When several people share the bathroom, a simple log is more reliable than memory. Record the date, approximate time of ordinary use that has already occurred, door position, visible puddles, and changes to the stain. Do not use a suspect shower solely to compare scenarios. Arrange another bathing option while the fixture is out of service. In a rental or condominium, notify the responsible person promptly so adjacent rooms and units can be protected. Keep copies of notices and photographs for the diagnostic team.
Look for a shower leak at the threshold and door
A shower leak at the threshold may appear as splash, a poorly fitted door sweep, a threshold that fails to contain water, or a damaged transition joint. Without running the shower, look for a detached door seal, blocked track, or a clear trail across the outside floor. A puddle on bathroom tile is not proof of a leak beneath the shower base. Conversely, even a modest puddle that returns repeatedly can damage a baseboard, floor, or ceiling below over time.
A curtain can allow water over a tub or pan edge when it sits outside the enclosure. A curbless shower relies more heavily on proper slopes and water containment. Darkened corners, loose caulk, or blistered paint are reasons to inspect the full assembly, but they do not by themselves distinguish a surface finish problem from failed concealed waterproofing. Avoid applying new silicone to a damp area as an experiment: it may temporarily hide a useful clue or trap moisture.
If flooring beside the shower feels soft, rises, or remains damp after visible water has been wiped up, stop using the fixture and arrange an assessment. Damage to underlayment or framing may extend beyond the visible patch. A professional can decide whether a finish needs to be opened to identify affected materials and trace water. Avoid walking on an area that seems unstable, particularly when there is an occupied space on the floor below.
Look for clues at the valve and pipe penetrations
A shower leak concentrated behind the mixing control or outlet could involve a supply fitting, a valve component, a pipe penetration seal, or waterproofing around the trim plate. A trim plate that fits neatly against tile does not establish continuity behind it. A stain on the opposite side of the wall may also come from a pipe unrelated to the shower. The investigation must separate the hydraulic source from the point where water becomes visible.
If there is an existing service access and it is dry, you can tell the plumber what is visible without removing electrical covers or disconnecting plumbing. Do not remove a cartridge, spout, or sealed plate to hunt for water. Early disassembly may change a joint's condition and make the original path harder to establish. Photograph visible components and their position. Note corrosion or deposits, but remember that an old mark is not necessarily evidence of the current leak.
Running water sounds, reduced pressure, or unexpected meter use may add weight to a supply leak hypothesis, yet each has other explanations. Silence does not rule out a slow leak. Weak flow at one showerhead may be a local fixture issue unrelated to the stain. If the evidence remains ambiguous between supply, drainage, and enclosure, read the broader hidden water leak guide and describe the uncertainty to the professional rather than choosing a repair by guesswork.
Consider the drain, pan, and room below
A ceiling mark below the centre of a shower may draw attention to the drain, trap, or connection between drain and waterproof layer. It still does not locate the fault automatically: water can travel sideways before dropping. Slow drainage can raise the water level in the base and expose vulnerable joints for longer, but a slow drain alone does not prove the drain assembly leaks. Clearing a blockage will not repair a failed membrane or plumbing joint.
For a prefabricated pan, a visible crack, unusual movement, or separation from the wall deserves evaluation. In a tiled shower, the waterproofing connection to the drain is part of the system. Details differ among products and assemblies, so no universal sealant can be recommended without knowing how this shower was built. A professional should establish the cause before deciding whether a local fix is durable or a larger section of the assembly needs reconstruction.
Observe the room below without touching a weakened finish. An old stain may remain after a successful repair; a spreading outline, blistering paint, or fresh drops show a change worth recording. A moisture meter in professional hands can help map affected materials, but one reading does not prove the source or establish that the entire cavity is dry. Openings and controlled tests belong in a planned investigation that accounts for electrical hazards, materials, and the risk of additional water damage.
Condensation or a leak: why they are confused
A poorly ventilated bathroom can collect condensation on a cold wall, mirror, window, or pipe. It may peel paint and support mould even when no pipe has broken. Distribution helps interpretation: mist on several cold surfaces after a hot shower suggests general humidity, while one concentrated wet patch, local drip, or wet ceiling below calls for leak investigation. Both conditions may happen together, so improving ventilation is not a reason to dismiss a recurring stain.
Check whether ventilation operates and whether accessible surfaces can dry; do not block an exhaust grille. Better airflow alone cannot certify that a deep or persistent stain is resolved. Health Canada recommends identifying and correcting the moisture source before dealing with mould. Painting over a wet patch or hiding it behind trim can delay discovery of damaged materials. It can also make later documentation of the original water path harder.
A musty smell can persist when the exposed surface feels dry. It warrants inspection, especially if the suspect area is behind a cabinet, baseboard, or panel. Avoid scraping a large mouldy area or opening a wall without a protection plan. People with asthma, respiratory conditions, or particular sensitivities should not be unnecessarily exposed to a suspect area. The extent of moisture and the materials affected determine the appropriate cleanup and restoration method.
What a professional shower leak diagnosis should separate
A useful shower leak visit starts with the history: first appearance, ordinary use, adjacent rooms, recent work, photographs, and progression. The plumber may inspect accessible fittings and the arrangement of supply and drainage. Depending on the evidence, targeted investigation, observation through an existing access, or a limited opening may be recommended. Ask what hypothesis each step checks and how the home will be protected. If plumbing proves intact and the shower enclosure is at fault, a waterproofing or renovation specialist may also be needed.
Ask what has been confirmed and what is still an assumption. Is a visible joint repair enough given the materials behind it? Was the membrane examined? Were the drain and its waterproof connection checked? Who will dry the cavity and restore finishes? Which signs should prompt another inspection? These questions help distinguish stopping a visible drip from correcting the full water path. A clear explanation is especially valuable when several trades will be involved.
A quote should separate investigation, plumbing repair, waterproofing, drying, and finish restoration. Discoveries behind a wall can change the scope; ask how additional work will be documented before it proceeds. Keep photographs, findings, a description of the repair, and information about any removed parts when available. If a broader bathroom project is being considered, separate the work needed to correct this leak from optional upgrades. A ceiling stain alone does not establish that a full renovation is necessary.
Drying and restoration after the source is corrected
Stopping a shower leak does not automatically dry drywall, insulation, wood, or the underside of a floor covering. Next steps depend on how much water entered, how long it remained, what materials were affected, and whether the cavity can be reached. One material may need removal while another can be dried and retained after assessment. Ask how the team will determine that the area is ready to close. Health Canada's guidance emphasizes prompt action on moisture and hidden mould because surface appearance may understate the problem.
If water came from a drain, clarify whether it may have been contaminated. Toilet or sewage water requires different precautions from a clean supply leak; do not treat contaminated materials as a cosmetic stain. A restoration specialist may be needed for cleaning and remediation. Avoid pointing a fan at a large mouldy area or carrying damp, contaminated materials through clean rooms without a containment plan. If anyone has a health concern related to indoor air, seek guidance from an appropriate healthcare professional.
Before the shower is used again, confirm that the necessary plumbing repair, waterproofing work, drying, and finishes are complete and that the contractor has explained suitable verification. An early return to use can wet a cavity again. Monitor the same signs that prompted the call and keep a record of the condition of nearby surfaces. If the stain comes back, share new observations with the diagnostic team rather than layering on repeated surface repairs.
Prepare the call and request the right scope
Describe the immediate risk first: active dripping, a distorted ceiling, nearby electrical equipment, a musty odour, or a stable old mark. Explain the layout: tile or prefabricated pan, door or curtain, storey, room below, existing access, and other nearby fixtures. Give the date of the first sign, last ordinary shower use, and photographs. Say what you have already done, including taking the shower out of service or closing a shutoff. This helps triage without pretending that a remote description establishes the cause.
For a suspected shower leak in the plumbing, see ProDrain's water leak detection and repair service. If assessment instead points to the membrane, door, or structure, ask which trade should take the next step. The goal is an established cause, an appropriate repair, and dry materials, not simply a fresh bead of caulk over a damp assembly. More related topics are collected under leaks, faucets and fixtures.
Frequently asked questions
Can a shower leak when every tile looks intact?
Yes. Tile is a finish, while the waterproofing layer is often behind it. A fault at the drain connection, membrane, pipe penetration, or threshold can let water through without a broken tile. Appearance alone cannot rule out a hidden leak. The actual assembly and water path need evaluation, especially when the room below is affected.
Should I recaulk the shower immediately?
Not before the problem is understood. A worn joint may contribute to escaping water, but new caulk cannot repair a supply fitting, drain connection, or failed membrane. Applying it over a damp surface can hide a developing clue. Document the signs and determine whether the issue is truly limited to an accessible joint before selecting a repair.
Why is the stain far from the shower?
Water can follow framing, the back of a panel, a pipe, or a floor slope before it emerges. The exit point is not necessarily the entry point. The room below, neighbouring wall, and any existing service access all matter. Avoid opening the wall at the centre of a stain without a diagnostic plan.
Stopping use and planning repairs
Can we keep using the shower if the mark is small?
A small visible mark tells you little about water retained behind the wall or beneath the pan. If moisture is new, recurrent, or spreading, stop using the shower and arrange an assessment. If it reaches electrical equipment, the ceiling deforms, or contaminated water is possible, have the area made safe promptly. Repeated showers may worsen damage that remains hidden.
Will inspection always find the problem without opening a wall?
No. History, photos, observation, and noninvasive measurements can narrow the search, but some joints remain concealed. A targeted opening may be necessary to confirm the source and assess wet materials. The professional should explain why that step is useful and how the area will be protected before work begins.
Is a plumbing repair enough to restore the bathroom?
Not always. A fixed pipe may leave wet insulation or drywall; a shower enclosure leak may require separate waterproofing work. Drying, possible remediation, and finish restoration need their own assessment. Ask who coordinates each stage and what evidence is needed before the shower returns to service.
Further reading
Health Canada, guide to addressing moisture and mould indoors.