
Toilets
Running toilet: find the cause and choose the next step
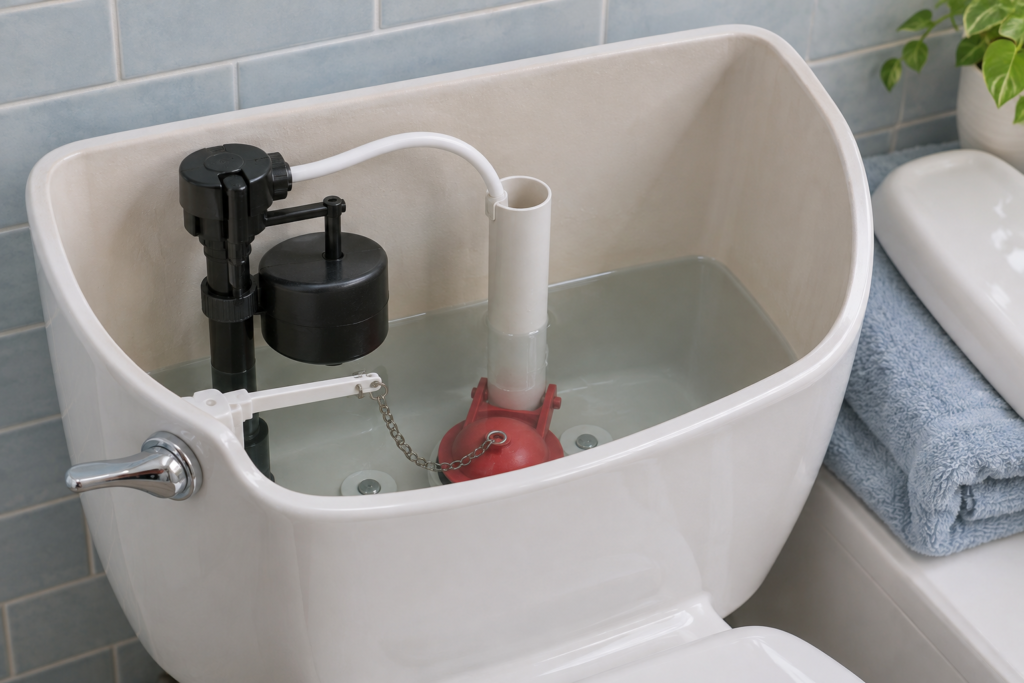
A running toilet usually has one of two problems: water keeps escaping from the tank into the bowl, or the tank keeps receiving water after filling should have stopped. Before buying a replacement flapper, find out where the water goes. Water entering the overflow tube, water passing a flush seal and water leaking onto the floor require different decisions.
Start outside the toilet. If the floor is wet, the porcelain is cracked or the bowl is close to overflowing, stop using the fixture. Close its supply valve only if you can reach and operate it safely without forcing it. Containing an active leak takes priority over investigating a noise. Do not leave a leaking fixture unattended while trying another test.
Running toilet: identify the symptom first
Listen after a normal flush, then again when nobody has used the bathroom. Does the filling stop completely? Does it restart on its own? Does returning the handle to its resting position change anything? Write down the sequence rather than labelling every sound a faulty valve. A brief recording can help explain an intermittent problem that disappears when someone arrives to inspect it.
Water moving through the bowl after the tank should be at rest suggests an internal path. Moisture behind the toilet requires a separate check of visible connections and the tank exterior. Condensation is another possibility, but it should not become an explanation for a puddle without checking for leakage. Photograph the wet area before drying it so the location remains clear.
Some filling after a flush is expected. The number of seconds alone does not diagnose a failure because model, supply conditions and settings differ. Look for a completed cycle followed by a stable resting period. If filling seems slow while water continues escaping, both symptoms can be present. The separate guide to a slow-filling toilet tank helps you keep those observations distinct.
Prepare before lifting the lid
Clear a stable surface and place a towel on it for the porcelain lid. Do not balance the lid on the toilet seat or bath edge. On some top-button toilets, the lid connects to the operating mechanism; check the instructions before pulling upward. If something holds it in place and you cannot identify the attachment, stop rather than twisting until it releases.
This guide mainly concerns a visible gravity toilet tank. Pressure-assisted vessels, concealed cisterns and electronic fixtures need their own manufacturer procedures. Do not open a pressure vessel or electrical housing to follow advice written for an ordinary tank. Take a general photo and record markings that you can read without dismantling anything. Keep the lid and loose items away from children and pets.
Locate the toilet supply valve and hose without moving them. A valve that is corroded, seized or already damp deserves attention before any repair. Do not use pliers to force its handle. If reliable isolation is unavailable, limit your work to safe observations and arrange service. Make sure the person attending can reach the valve without moving storage or bathroom furniture.
Understand the inlet and outlet
The fill valve admits water. The flush mechanism releases stored water into the bowl. Between flushes, a flapper or another type of seal keeps that water in the tank. The float controls the filling level, while the overflow tube provides a path into the bowl if the water rises too high. Observing these separate functions is more useful than replacing every part because the toilet sounds noisy.
This overview is a way to organize observations, rather than a universal adjustment recipe. A hinged flapper, a canister seal and a dual-flush assembly may use different attachments and settings. Record the tank number as well as the mechanism reference. If parts were replaced previously, the installed mechanism may differ from the original equipment shown in the toilet’s older documentation.
Make three notes: the resting water level, the apparent path of moving water and the position of the operating control. A simple sketch or photo is enough. Compare before and after each authorized adjustment. Changing several settings together makes it difficult to know which change helped and may conceal a second issue behind a quieter filling cycle.
Use a dye test to check for internal leakage
The City of Toronto describes a toilet dye test: put suitable food colouring or test dye in the tank, do not flush, and watch for colour entering the bowl. Its suggested observation period is ten to fifteen minutes. This Canadian municipal guidance explains the test; Toronto billing figures do not apply automatically to a Quebec household.
Choose a quiet period and tell everyone not to use the toilet. Wait until normal filling has finished before starting. Note the time and photograph the result, then follow product and surface-care instructions when rinsing away the dye. A flush during the waiting period makes the result unsuitable for deciding whether water passed into the bowl on its own.
A positive result confirms internal movement but does not identify every possible failed component. The water level and mechanism still matter. A negative result at one moment does not resolve an intermittent complaint either. If running occurs only after certain flushes, observe a complete cycle under those conditions and include that difference in your repair request.
This test does not explain water on the floor. Treat exterior leakage separately and promptly. Do not keep adding dye to a fixture whose connections are actively leaking. Your notes only need the date, apparent level, test result and whether exterior surfaces stayed dry. You do not need an elaborate record to give a plumber useful evidence.
When water enters the overflow tube
Watch whether the water reaches the overflow opening and continues entering it after normal filling. That points the investigation toward the fill level, float movement or a valve that no longer shuts off correctly. It is not a reason to plug the overflow tube. Never defeat this passage to suppress the sound or raise the stored water level.
Compare the actual level with the marking and instructions for your model. Do not adopt a measurement supplied for a different toilet. Photograph the original setting before making any adjustment that the manufacturer permits. Look for an obvious obstruction to float movement without bending parts. A control trapped against another component requires a different response from a worn valve.
Stop adjusting if the level will not stabilize, the inlet continues despite the correct setting or you cannot identify the equipment. The goal is the intended operating condition, rather than silence at any cost. Lowering the level too far can create poor flushing while leaving the original problem unresolved. Explain the level behaviour when arranging an assessment.
When the tank loses water between uses
If the supply can be isolated safely, comparing the water level before and after a period without use helps separate stored-water loss from prolonged filling. Fluidmaster’s running-toilet troubleshooting distinguishes fill-valve problems from losses through the flush mechanism. Follow the instructions relevant to compatible components, rather than treating one manufacturer’s part recommendation as a match for every toilet.
Before blaming a worn flapper, observe whether the operating control holds it slightly open. A tight or caught chain can interfere with closure. With a canister mechanism, look for a full return to the resting position; do not remove the canister without its procedure. The useful question is whether the closure can settle freely in the configuration the manufacturer intended.
Avoid scraping a sealing surface with a metal tool or applying adhesive to compensate for the wrong seal. Use only approved cleaning methods when cleaning is recommended. Pressing harder cannot make an incompatible or distorted component reliable. If loss continues after a permitted correction, retain your observations and have the assembly checked before buying another assortment of parts.
Does the handle return normally?
A toilet that stops running when the handle is gently returned to rest deserves closer attention to the control. Note whether the handle stays down, rubs against the tank or returns slowly. Do not add a weight or expect occupants to jiggle it after every flush. A household habit that temporarily stops the sound can conceal a control problem.
Chain slack and attachment depend on the mechanism. The separate guide to a loose toilet handle covers that specific issue. Here, establish whether the control interferes with closure. A change in handle position that stops the water is a useful clue to report; it does not prove that the seal and every other component are in good condition.
For dual-flush equipment, observe each button separately according to its instructions. The lid position can affect some operating arrangements. Return the assembly to its normal configuration before judging the result. If the problem happens only with the lid installed, mention that detail rather than randomly shortening rods, rerouting a cable or changing the mechanism height.
Match replacement parts by model
Before shopping, collect the brand, tank number, installed component reference and clear overall photos. Include attachments and orientation. Apparent diameter is only one consideration; the fastening system and flushing behaviour also matter. A package labelled universal still has compatibility requirements. Ask the supplier to match your information instead of choosing the part that looks closest through its packaging.
Find out whether the proposed work replaces an accessible seal or requires removal of the tank. That distinction affects tools, leakage risks and how long the toilet may be unavailable. Old fasteners may not release normally. Buying several kits for successive experiments can change working components while the actual defect remains unidentified, making the next diagnosis more difficult.
Keep the packaging, part reference and installation instructions for future maintenance and any warranty inquiry. Check the actual warranty conditions rather than assuming every failure is covered. A part’s retail price is not an estimate for a visit that also includes diagnosis, travel, difficult access or a defective supply connection. Ask what the quote includes and what could change after inspection.
Quebec work permissions and building access
Reading instructions and watching a fill cycle do not settle who may carry out plumbing work in your building. The CMMTQ explains conditions for doing plumbing work yourself. Confirm the requirements that apply before replacing mechanisms or changing connections. An owner-occupied home, a rental dwelling and a condominium should not be treated as interchangeable situations.
If you rent, promptly inform the landlord or designated contact with a clear account of the symptoms. In a condominium, follow the syndicate’s procedures for access and any water interruption. Do not operate a shared building valve to isolate your own toilet. A private fixture problem does not authorize changing water service to other units, even if the valve appears easy to reach.
Think about practical access: can the fixture remain out of service, is another toilet available and who can meet the plumber? These questions are more useful than assuming every repair takes a few minutes. Report unreliable isolation, spreading damage or lack of another usable fixture at the first contact so the situation can be assessed accurately.
When to request toilet repair
Arrange service for damaged porcelain, water on the floor, a shutoff that will not close or leakage that returns after a correct adjustment. Unidentifiable or repeatedly replaced mechanisms also warrant assessment. ProDrain’s toilet repair and installation service explains the commercial next step when observations are no longer enough to select a reliable correction.
Describe the desired outcome: stop water loss, retain effective flushing and verify that the fixture stays dry after the work. Ask whether the recommendation is a targeted repair or a full replacement, and why. Running alone does not automatically justify a new toilet. Conversely, a new flapper is not a solution for cracked porcelain. The decision should follow the condition actually found.
Before the visit, clear the space around the toilet and the supply valve. Keep photographs available and disclose anything already added to the tank. Describe unsuccessful attempts as well as successful ones. This helps explain the current settings and avoids starting from an incomplete history. Do not take the toilet apart further simply to supply a more detailed photograph.
Check the result under normal conditions
After the work, observe several ordinary cycles with the lid back in place. Does the control return freely? Does filling stop? Do the floor and visible connections remain dry? Listen again during a period without use. One quiet flush does not fully check an intermittent problem that previously returned later in the day or only with a particular button.
Retain a short record of the replacement part, service date, invoice, relevant manufacturer setting and test outcome. If symptoms return, this helps distinguish recurrence from a new complaint. Contact the person who performed the work before immediately adjusting another component. State what changed and when, rather than assuming that every subsequent noise has the same cause.
Prevention starts with noticing a change promptly. Occasionally listen to the bathroom at rest and investigate refilling without use. For the broader conservation question after repair, see ways to reduce water use at home. Actual savings depend on the leak and local charging arrangements; there is no single dollar estimate for every Greater Montreal household.
Make a clear request without claiming a diagnosis
You do not need to name the failed part before asking for help. State whether water stays inside the toilet, whether the floor is dry, whether isolation works and whether another fixture is available. Include the brand if known. This creates a concrete starting point without converting a tentative explanation into a confirmed diagnosis or ordering parts prematurely.
If running started after a component replacement, locate that part’s reference and explain the difference. Perhaps the noise used to be intermittent and is now continuous. That does not automatically establish a manufacturing defect: compatibility, settings and a separate problem may still require checking. Keep old parts available if you retained them, but do not reinstall them merely to reproduce the failure.
Before leaving home for an extended period, do not depend on someone remembering to reposition the handle. Arrange repair or reliable isolation with the building’s responsible person. Any temporary arrangement should be clear to occupants, including which fixture is unavailable and who will follow up. A note about the temporary condition is more useful than an unexplained closed valve.
Frequently asked questions
Why does the toilet refill when nobody has used it?
Internal water loss can lower the tank level and trigger filling again. Record the pattern and check for movement into the bowl without flushing. That helps direct the investigation, but it does not identify a replacement part until the mechanism and actual leakage path are checked.
Should I add drain cleaner to stop the running?
Continuous tank filling does not by itself diagnose a blockage. Do not add drain cleaner to stop the inlet. If the bowl rises or drains poorly, stop repeated flushing and report that separate symptom. It calls for a different assessment from an internal tank leak.
Should the flapper be replaced on a fixed schedule?
Follow the manufacturer’s maintenance instructions and the observed condition. This guide does not set a universal lifespan. Check whether the component matches the model, closes properly and remains intact. Keep its reference so a future replacement can be selected accurately.
Can repair wait if there is no puddle?
An internal leak still deserves prompt attention because it wastes water. Arrange correction and avoid leaving the fixture running unnecessarily. Exterior leakage, unreliable isolation or an overflowing bowl changes the priority; report those conditions immediately when seeking help.
Find related information in the Toilets advice category.